Eye of the Storm
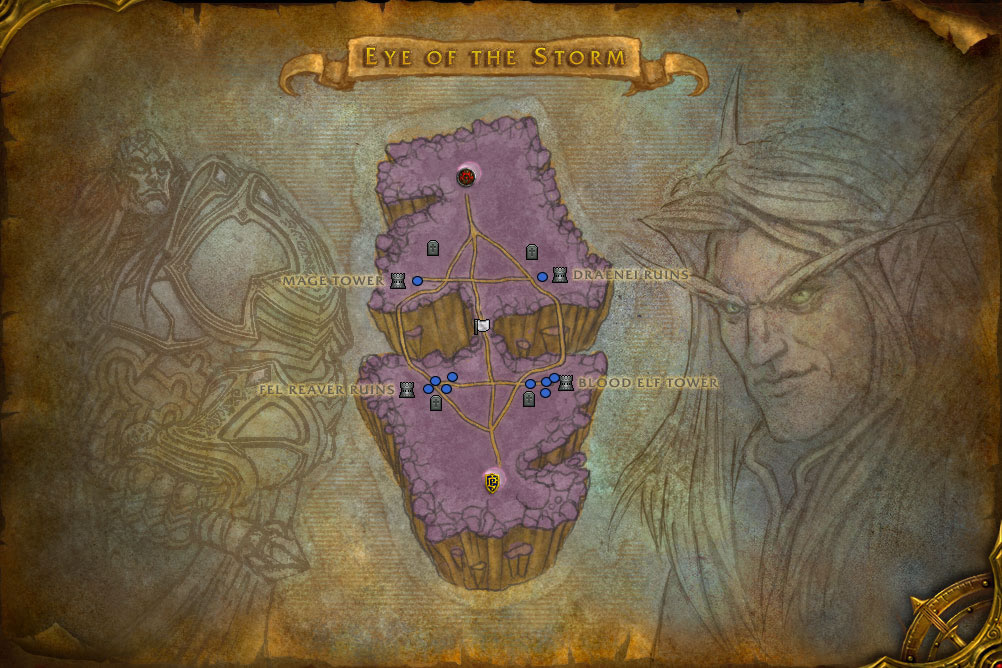
The goal of Eye of the Storm is to be the first team to reach 1600 points. Victories are made by controlling the bases (Draenei Ruins, Fel Reaver Ruins, Blood Elf Tower, Mage Tower) and by capturing the flag.
Strategy / Overview
The most important note to make about this battleground is this:
If you have to lose the majority of the flag caps in order to keep three towers, you should do so.
People will argue about this. But the maths are simple. If the other side has 3 towers, and it takes you two minutes to capture the flag -- they get 300 points (2.5 per second times 120 seconds) and you get 135 (0.5 per second times 120 seconds plus 75 for the flag cap). Keep doing this long enough and they will win.
Scoring Summary
Points Based on Towers Controlled
|
Towers
Every 2 Seconds Flag |
1
1 75 |
2
2 85 |
3
5 100 |
4
10 500 |
Against an evenly matched team, you may not be able to hold three towers for long periods of time, and you may sometimes have only one. So don't be surprised if the score swings back and forth, often dramatically.
Against an opponent of equal strength, your safest bet is probably denial. Don't let them have three towers for any length of time, and try to get the flag more than half the time.
There is an art to flag capping which can be loosely summarized as: grab the flag and hold it – capping it only when you have control of the midfield and can immediately grab it back. It's a lot harder than that, of course, which is what makes EotS such an interesting game.
Teams should be divided something like this:
|
Group 1
Healer Offence Offence Offence *mobile* |
Group 2
Healer Healer *mobile* Offence Offence |
Group 3
Defence Defence |
The Three Strategies
3v1 strategy
As always, have your groups assigned before you enter the battleground. Make sure that everyone remembers what group they are in. Try to allocate one healer for each group.
Group 1: Go to Blood Elf Tower
Group 2: Go to Fel Reaver Ruins
Group 3: Have one player go to Mage Tower until it is captures. Have one player go to Draenei Ruins until it is captured. The single player used to capture Mage Tower or Draenei Ruins would preferably be a dps and not a healer.
Groups are sent to both Blood Elf Tower and Fel Reaver Ruins not just to attempt to gain control of these bases, but also because if there were no players at one, it allows for easy access to the other bases by the enemy. For example, if both groups focused on Blood Elf Tower instead of splitting and having one group go to Fel Reaver Ruins, both Fel Reaver Ruins and Mage Tower would be practically wide open for the enemy and it would take some time for any of your teammates to reach these locations (especially Mage Tower) should they be attacked.
If the strategy goes as planned, your team will control Mage Tower and the Draenei Ruins while you battle for Blood Elf Tower and Fel Reaver Ruins. Hopefully, your team will gain control of either BET or FR if not both. Once your team has control of at least three bases, place defense where necessary and watch for incomings. Your team should attempt to hold three bases. If one base gets taken by the enemy, attempt to regain control of it or attack another base.
If your team is struggling to hold three bases, do not risk using players to run the flag or go for a fourth base. You can assign players to constantly attack the fourth base, however, just to keep pressure on the enemy and hold as many players as possible there. If you are doing this, the enemy may likely catch on and attempt to ninja-attack another one of your bases that isn't heavily defended. Just keep an eye out for this and call incomings.
Mobile players are first to go for defense. If more are needed, send players accordingly.
If you can accomplish three bases, the upside is enormous.
The team placement should look like this at the beginning of the match:
As always, have your groups assigned before you enter the battleground. Make sure that everyone remembers what group they are in. Try to allocate one healer for each group.
Group 1: Go to Blood Elf Tower
Group 2: Go to Fel Reaver Ruins
Group 3: Have one player go to Mage Tower until it is captures. Have one player go to Draenei Ruins until it is captured. The single player used to capture Mage Tower or Draenei Ruins would preferably be a dps and not a healer.
Groups are sent to both Blood Elf Tower and Fel Reaver Ruins not just to attempt to gain control of these bases, but also because if there were no players at one, it allows for easy access to the other bases by the enemy. For example, if both groups focused on Blood Elf Tower instead of splitting and having one group go to Fel Reaver Ruins, both Fel Reaver Ruins and Mage Tower would be practically wide open for the enemy and it would take some time for any of your teammates to reach these locations (especially Mage Tower) should they be attacked.
If the strategy goes as planned, your team will control Mage Tower and the Draenei Ruins while you battle for Blood Elf Tower and Fel Reaver Ruins. Hopefully, your team will gain control of either BET or FR if not both. Once your team has control of at least three bases, place defense where necessary and watch for incomings. Your team should attempt to hold three bases. If one base gets taken by the enemy, attempt to regain control of it or attack another base.
If your team is struggling to hold three bases, do not risk using players to run the flag or go for a fourth base. You can assign players to constantly attack the fourth base, however, just to keep pressure on the enemy and hold as many players as possible there. If you are doing this, the enemy may likely catch on and attempt to ninja-attack another one of your bases that isn't heavily defended. Just keep an eye out for this and call incomings.
Mobile players are first to go for defense. If more are needed, send players accordingly.
If you can accomplish three bases, the upside is enormous.
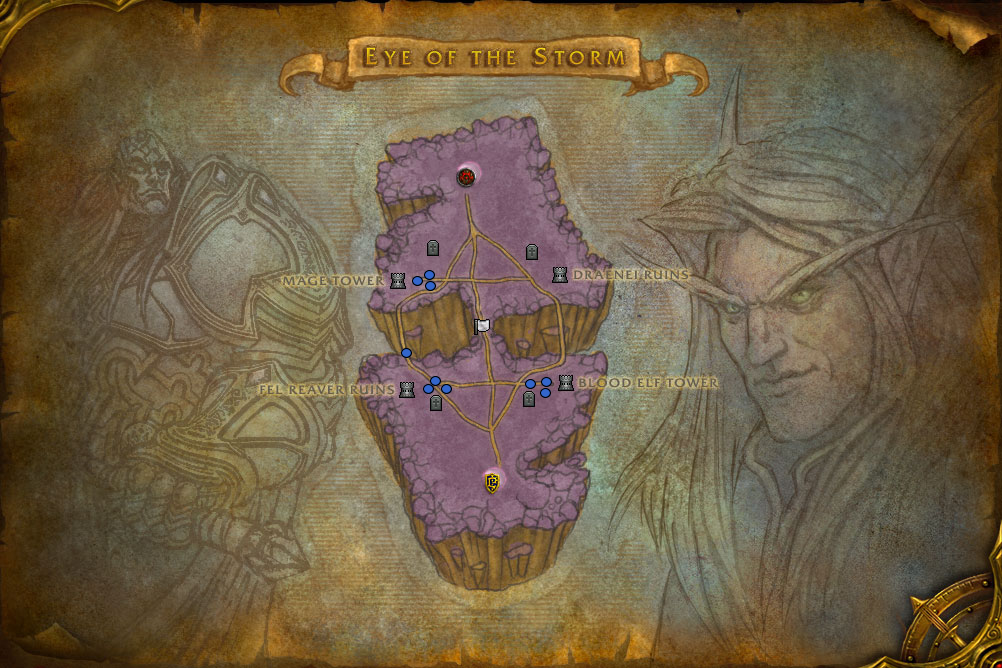
The team placement should look like this at the beginning of the match:
3v1 Rotating After you successfully take control of all three points, you now need to intentionally let the opponent take one of your points if they send more than five people to any single point.
You then use your forces on the opposite side of the map to counterattack the base they just left (the only base they still control) and trade bases with them. Yes, you gave up your base they just attacked, but you just gained the base they left. You're out-zerging the zerg.
Example of Rotating
You control Mage Tower, Draenei Ruins, and Fel Reaver Ruins. Your opponents control Blood Elf Tower. You have four players at Draenei Ruins and four players at Fel Reaver Ruins. You have two players at Mage Tower.
Your opponents decide to attack Draenei Ruins and Fel Reaver Ruins with fewer than four people at each point. You will most likely win, because you have the advantage of defender (that is, a nearby graveyard) and an equal amount of people at each point.
Your opponents decide to attack Draenei Ruins with 8 people. Your team announces the enemy attack location and number of people attacking. All four of your defenders at Fel Reaver Ruins move to Blood Elf Tower with the intent on capping it. The two defenders at Mage Tower move to Fel Reaver Ruins. A single person from Draenei Ruins moves to Mage Tower.
The battle now looks like 8v3 at Draenei Ruins and 2v4 at Blood Elf Tower. You will most likely trade Draenei Ruins for Blood Elf Tower. Everyone who died at Draenei Ruins will spawn at Mage Tower.
You're now back to square one -- you control three bases, the opposing team controls one; you are strong in two points and weak in one (with the correct formation). Nothing has changed.
If, instead of attacking a close point, the enemy decides to attack your weak point (in this case, originally Mage Tower) with lots of people, you can defend from both sides while simultaneously attacking and can actually get a four-cap.
End Game
Send the mobile healer from Group 2 to defend with Group 3. Your bases should have 3 defenders at each point with one mobile defender who is first to help defend any tower with an incoming onslaught.
Defend, defend, defend.
Do not go for the flag as your team is already spread thin and the opposing team cannot win with 1 base, no matter how fast they run the flag.
When Things Go Wrong
We only have 2 bases and can't gain a 3rd:
2 v 2 The False Attackers
With 2v2 False Attackers you will send one or two players from your defended bases to the opposing team's defending bases as false attacks.
If you are not attacking the enemy bases, they have little reason to keep more than one defender at the base. You'll end up with a very large battle over the flag that you weren't prepared for. By sending one or two members of your defending bases to the opposing bases, you keep multiple enemies there. You're essentially trading one member (or two) for three or four members of the opposing side. It's a false attack; you're winning because you sacrificed one person's position for far better overall position. It leaves fewer enemy players in the middle so you are able to control it and cap the flag more often, and faster. This is the only time you should run the flag in a 10 v 10
