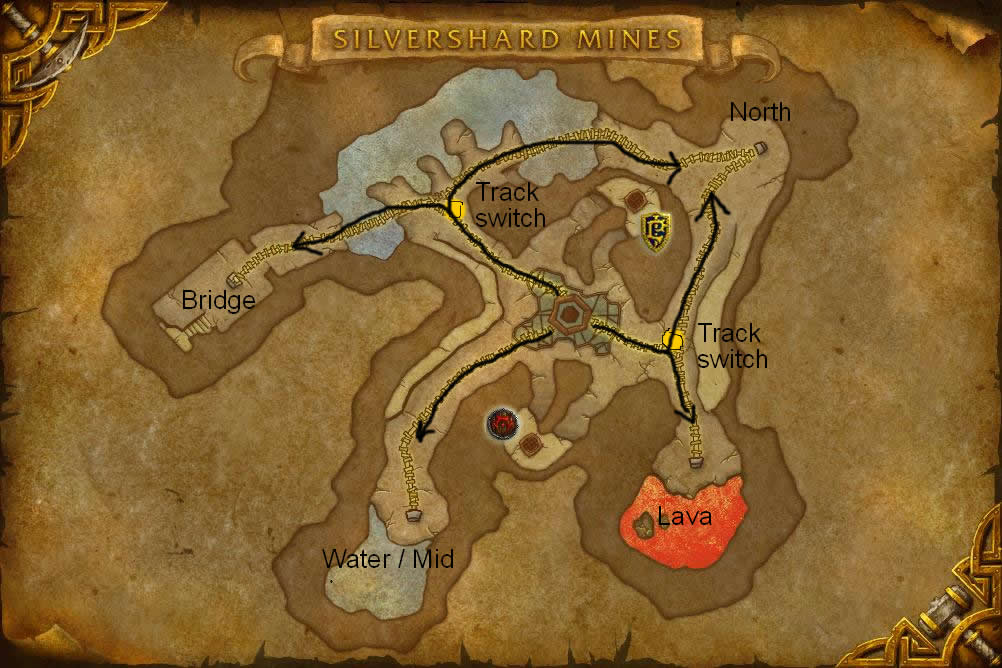
Silvershard Mines
Silvershard Mines is won by the first team to reach 1600 resources. Resources are gained by controlling and capturing mine carts.
Carts are controlled by players standing within the capture radius or circle surrounding the mine cart. The more players that are within the circle for a given team, that team will win the cart.
Carts are controlled by players standing within the capture radius or circle surrounding the mine cart. The more players that are within the circle for a given team, that team will win the cart.
Strategy / Overview
- You want to own 2 carts most of the time.
- You don't have to guard them all the way to the dump point, but you get a little extra if you do.
- Don't fight in the road ... be inside a cart circle ALL the time -- or, be at the depot waiting for a cart. The circle moves with the cart. While this seems obvious, it is easy to get caught up in combat and suddenly find yourself outside of the circle.
- There are two places where the tracks split and the cart can go in either direction. The direction is indicated by a lighted arrow that sits on a switch mechanism. By clicking (and holding) on the switch, you can change the direction of the cart. Since one track is longer than the other, doing this will either increase or decrease the time it takes the cart to arrive at the dump point. So, in general ... if it's your cart, make it take the shorter route ... and if it's owned by the enemy, make it go the longer route.
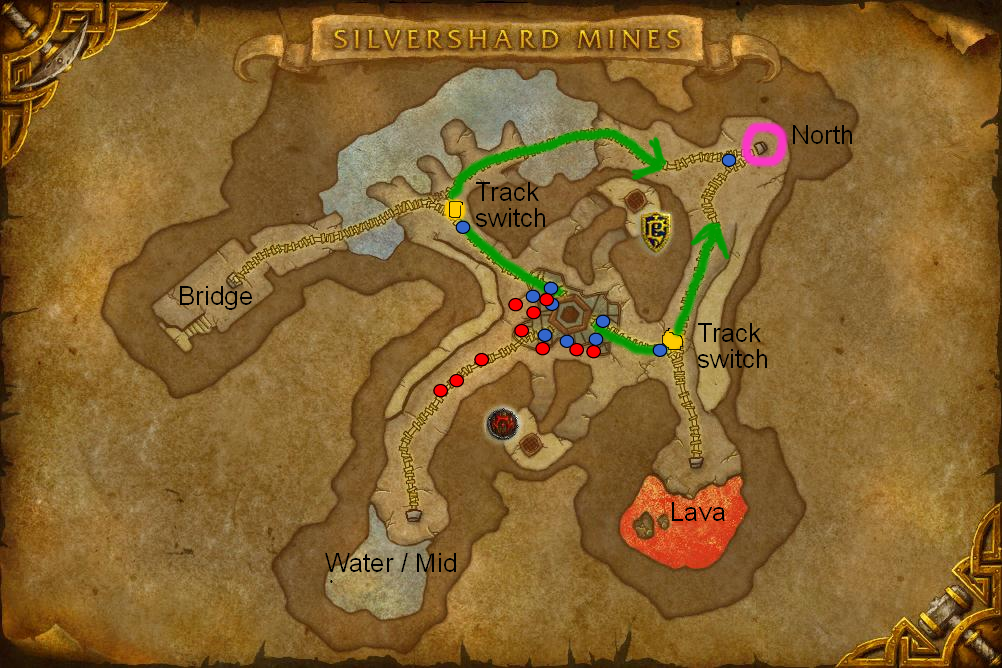
The Two Strategies
The Three Cornered Control
If you clearly have the superior team, you can speed up the game by controlling three spots on the map.
Control each switch and set the arrow to send the carts North. This seems longer, but once you have done this, one person, from
Group 1, guarding the North intersection (shown in the pink (#Fabulous) circle in the image below) and one or two people, from Group 1, guarding each of the switches will guarantee that you score two carts all the time.
With this in hand, the rest of your team can focus on the middle cart, with some pulling out for defense if either of the switch guards calls incoming.
This is also the best way to farm kills, as it traps the entire enemy team in the middle where they are bunched together and easy to find.
Teams should look like this:
|
Group 1 (Guarding North intersection and switches)
Defense Defense Defense |
Group 2 (keeping the opposition busy in the middle)
Healer Healer Healer Defence Defence Defence Defence |
Corridor Control
Because the capture points are at the ends of the mine tunnels, the middle area of this battleground is of little use.
Unskilled players will tend to congregate in the middle and surround carts as they leave the terminal. Rather than engage in a huge melee, from which it may be difficult to pull out and follow the carts, your team may want to control the ends of the corridors and wait for the carts to arrive.
This strategy works because the points scored when a cart "caps" are much larger than the points received by guarding the cart the whole way in.
A good starting plan is to control the end of the water/mid mine shaft and the switch at lava shaft. The lava shaft is the shortest, but since it can be switched to its northern track, the junction needs to be guarded. However, if you control the junction, you can keep the enemy out of the shaft entirely and only send one or two of your team down with the cart.
If you can gain control of the water/mid corridor at its top end, that's good but you don't need that. For example, you can put Group 1 on the eastern switch to guarantee control, and then send group 2 down the water/mid corridor (or over to the bridge corridor) in time to take control of and cap the cart.
Teams should be as follows:
|
Group 1
Healer Healer Healer Defence Defence Defence Defence |
Group 2
Offence (Stealthed) Offence (Stealthed) Offence (Stealthed) |

